Showing posts with label Tools. Show all posts

Tuesday, November 10, 2015

Tools: Some of You Might Find This Strange

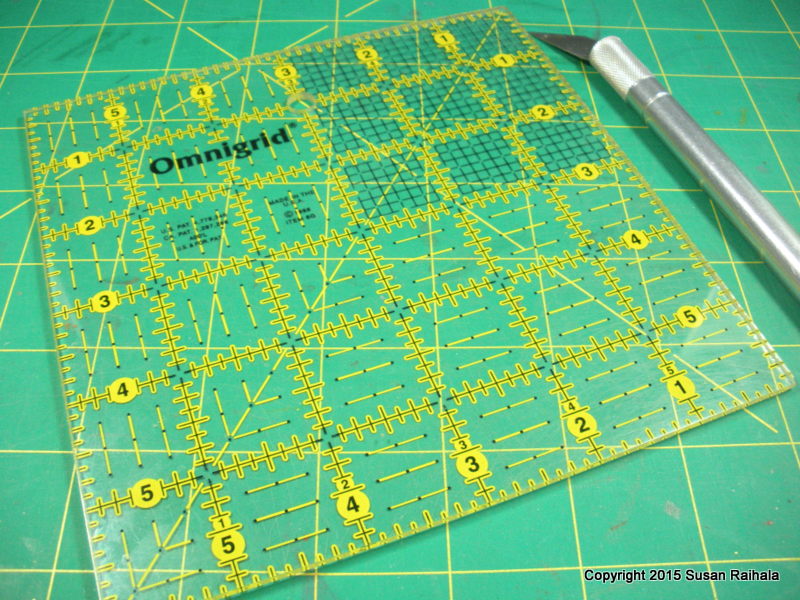
You may or may not know that I came to cardmaking via bookbinding. If you've ever gotten serious about bookbinding yourself, you understand completely why Omnigrid quilting rulers (in various sizes), a craft knife, and cutting mats (in various sizes) are essential tools in my paper crafting studio.


If you've never gotten into bookbinding, however, these tools might seem a little strange, especially when you learn that I've never made a quilt--or even a quilted table runner--in my life.

Bookbinders need to cut paper and book board at precise right angles and precise measures. They often work with giant sheets of paper that won't fit into a standard 12" rotary or guillotine paper trimmer. Omnigrids are incredibly useful for these circumstances, especially when combined with long metal rulers and box cutters for heavier jobs.

These days, my six-inch Omnigrid square works perfectly for most cardmaking needs. Any time I need a mat (for those rare layered cards) or to cut a piece for white-on-white layering (much more common), I reach for the knife and Omnigrid. The cutting mat (a large one, though not my largest!) lives permanently on my desk. The see-through design of the Omnigrid is perfect when I need to cut a strip with a sentiment and want even borders surrounding it, for instance.

A word of warning: knives cut paper, but they also cut fingers. In 13 or so years of using these, I've only nicked my finger nails a few times, but as long as you keep your fingers away from the edge, you should be okay. Also, after 13 years, you don't want to start to feel over-confident, brag on line that you've never cut yourself, and then find yourself at the ER getting stitches. How embarrassing!

Thankfully, this hasn't happened yet, although I don't want to get cocky. Pride goeth before a fall...and I don't want to get stitches.

Anywho, these are useful tools I work with all the time. It's easy to take such unglamorous items for granted, but seriously, they make my crafting so much easier.

Just remember to keep your fingers safe.

Oh, and if the knife rolls off your desk, don't reach to catch it. Let that puppy hit the floor. 'Cause you know you'll get stabbed and might get blood on your card stock, which will ruin it.

It would, after all, be weird to try to make background paper with real blood stains. Right?


Thursday, September 24, 2015

Tools: Clean Those Stamps!

Okay, I must confess a certain level of neat freakishness when it comes to cleaning my stamps. Stampers exist (you know who you are!) who rarely clean their stamps.

How do they sleep at night? 

SERIOUSLY!!!


ThreatCon-Alpha Cleaning

Cleaning stamps requires--for us freakish neatniks--two levels of cleaning. The first level, what we might call ThreatCon Alpha, utilizes the amazing cleaning powers of water and friction. I use one of these travel cases for Huggies, left over from the days long past when I carried a diaper bag.


Of course, I don't put Huggies or any sort of baby wipe in here because some wipes contain chemicals that can hurt your stamps over time. (I read that on the internet so it must be true.) Instead, I use old washcloths that are dampened with tap water and wrung out. Washcloths are cheaper anyway.


Important Safety Tip: Do not close the wipe container completely with a wet washcloth in it. The washcloth will grow microscopic bacteria, start to stink, and--if left long enough--will grow visible mold, mildew or bacterial mats to rival what you see in the thermal pools of Yellowstone National Park.

Come to think of it, this particular wipe container is, technically, not the one I used in the diaper bag lo those many years ago. The current case replaced one that grew enough stinky life to walk away on its own.

Just don't close the lid all the way. Leaving it cracked lets evaporation outpace spontaneous generation of mutant life forms.

I keep a supply of old washcloths in a drawer in my craft area and generally change them out every other day or so.


ThreatCon-Alpha cleaning works great on pigment ink (Brilliance, Impress, etc.) and non-staining dye inks (like Memento). These wipe off and don't generally leave a residue behind. For inks that stain stamps or leave residue, however, we need to step up the threat condition a bit.


ThreatCon-Bravo Cleaning

For Hero Arts, Memories, Ancient Page, chalk, hybrid, or other staining inks, simple water and friction won't suffice. We need chemical warfare to get those stamps properly clean.

Have you ever stamped an image in light ink and thought the color was off? You probably hadn't cleaned the stamp properly after previous use. Leaving a dark staining ink on a stamp means running the risk of contamination when using a lighter ink.

Don't take this risk! Two simple, long-lasting supplies will remove the threat and get your stamps sparkling clean in no time.

This scrubber has lasted about ten years and is still going strong, and the bottle of
Ultra Clean is my second--just opened--in the same span of time.

A stamp scrubber and Ultra Clean stamp cleaner work to remove pesky stains and contamination from rubber or photopolymer stamps.


Spray the cleaner on the lower pad (which is thicker and removable for washing), rub your stamp on it, then rub the stamp on the dry top pad (which is thinner and glued to the the plastic container), and your stamp is dandy clean!

The cleaner, which has magical anti-grossness properties, won't grow bacteria if the container is closed, so no worries there.

Important Safety Tip: DO NOT, under any circumstances, leave a photopolymer stamp resting on the cleaning pad for any length of time. The cleaner on the bristles of the pad WILL damage the stamp by leaving impressions of the bristles. Wiping the stamp dry after cleaning will prevent any damage.

Note #1: Staz-On Ink requires its own cleaner...according to the internet. I have that cleaner also, with its sponge applicator built in, but rarely use Staz-On.

Note #2: I love the stamp scrubber thingie but you could just spray the cleaner on a washcloth, too...although some cleaner might be wasted if it gets absorbed into the washcloth.

Note #3: Some inks will permanently stain photopolymer, regardless of cleaners used. This staining in no way affects the performance of the stamps and doesn't bother me at all.

Note #4: How patient you are with notes to have made it this far. Thank you!

Feel free to share your tips and techniques for cleaning stamps in the comments. Perhaps I can pick up some new neat freakishness!

Monday, September 14, 2015

Tools: Empty Gift Cards and Wire Colanders

The last Tool post showed a fabulous Teflon folder that was a bit pricey as bone folders go. But today, the first tool I'm spotlighting need not cost you a penny.

Here's a freshly re-inked Brilliance ink pad
with the ink mostly smooshed in.


Always ask for your used-up gift cards back from the clerk after you use them. These handy rectangles of flexible plastic are the PERFECT tool for smooshing thick pigment inks into spongy ink pads.

Generally, the instructions on reinker bottles say to use the bottle tip to smoosh the ink in, but that takes forever and a gift card works ever so much faster and cleans up easily, too.

And yes, I made up the verb smoosh. Because it perfectly describes what you have to do.

Reinking dry ink pads is one of my least favorite tasks of paper crafting. Ugh. Just not fun. Neither is cleaning clear stamps that have lost their stick, but a cheap wire mesh colander from Target at least keeps me from losing the tiny ones down the soapy drain.


If your clear stamps lose their stick, all you have to do is put the stamps in the colander, put the colander in a sink with some soapy water, swish the stamps with your fingers, rubbing the backs to remove the dust and oil, rinse with clean water, and dump the stamps out on a lint-free towel to air dry.

That's all there is to it. It's not glamorous, but it works.

So as you can see, not all the tools we use need be expensive...just useful.

What other useful tools have you discovered that are inexpensive/free/re-purposed? Please share!

Monday, August 31, 2015

Tools: Folding Basics

One of the most fundamental of card-making tools is the bone folder. This handy tool allows you to fold even 120# card stock without it looking like a kindergartner folded a piece of construction paper against the grain and awkwardly pressed the crease.

My apologies if I offended any kindergartners.

Anyway, paper is made of fibers that, in the case of machine-made paper, generally line up either parallel to the short or long edge of the paper. That is called the grain. If you fold paper against the grain, it will look terrible...all crinkly and weird...unless you score the paper first with a bone folder and then smooth the crease with the bone folder.

Then, it looks just fine.

If the paper is thick, even folding with the grain looks better when you've scored.

So you need a bone folder.


Teflon folding tool, plastic folding tool,
 and a butter knife.
Most bone folders these days are not actually made of bone...but back in the good ol' days, they were made of real bone so the name stuck. You can find plastic bone folders like the middle one above that are very affordable at roughly $5, but that would, in my experience, be a waste of $5.

The best bone folders are made of Teflon and will cost you around $23. Given that you will use this tool on every single card you make, it's worth every penny.

Bone folders have two primary purposes.

1) Bone folders will SCORE paper, leaving an indentation that breaks down fibers and allows easy folding. You can score by running the bone folder over the paper using a ruler as a guide, or you can use a specially designed, grooved plastic panel such as the Scor-Pal (see picture below). Now, you don't really need a Scor-Pal (who am I kidding...of course you need one).

This is the older version I own.
The bone folder that comes with it is plastic and useless,
 and you should throw it away. The Scor-Pal itself is fabby though.
Basic scoring can very cheaply and easily be accomplished with a butter knife and ruler. I did this for several years when I was getting started. Occasionally, if I'm scoring really, really thick paper, I'll score first with my teflon folder and then go over the score again with the butter knife to break down the paper fibers even more. Also, I used the butter knife for scoring the vellum panel on this card. They are handy for sharp scores, and generally, everyone has one in their kitchen that hardly ever gets used. Why not put it with your craft tools instead?

2) Bone folders will also BURNISH paper. Burnishing smooths folded paper flat (especially important with the heavy card stock I use), and burnishing also bonds glued paper to mat board (generally only applicable for book binding). Now, here's why you need to buy a Teflon folder rather than a plastic one: plastic folders leave unsightly shiny marks on paper after burnishing. 

What is a crafter to do??!? Well, you could put a piece of waxed paper over the paper and burnish through that, or you could burnish the back of the card so the shiny bits won't really show. I did both of these things for years. Or you could spare yourself the anguish and inconvenience and buy a Teflon bone folder

And if you don't trust me, perhaps you should know that I first learned about Teflon bone folders from Her Royal Rubberness Julie Ebersole herself. Seriously, they are amazing.

Butter knives are not suitable for burnishing because the edges are too sharp.

The bottom line: For picky stampers, I highly recommend a Teflon folder and some sort of scoring board (I use the Scor-Pal, but others look basically the same). I use these two tools every single time I make a card.

Every.

Single.

Time.