Well, I made these to get myself out of a creative funk, and not really for any purpose other than that. However, when I made a love-themed one (shown at the end of this post), I decided it would be my hubby's Valentine...no need to mail, and he can put it on his desk as a tiny reminder of the fact he's loved. When he's done with it, he can throw it away...because once you get the hang of making them, they really are a piece of cake. I can whip one of these up in a couple of minutes because mine are CAS, though obviously the more complicated you get, the more time it takes.
One of my readers who replies via email said she wants to make them to put in her granddaughter's lunch box "on days when she might need the feel of a little extra hug." What a wonderful idea!
Another possibility is to make a bunch that relate to each other in some way and assemble them on a mat and use it as wall art. Like this...
 |
| Source |
You could also hang matchboxes as Christmas tree ornaments. I'm contemplating doing a bunch of Christmas-themed ones later this year to add to my paper-ornament tree. You can add a string loop before gluing one end of the box or after the box is made by punching tiny holes in one end of a box and knotting string on the inside of the holes or looping string through the holes. And wouldn't it be neat to make 24 of them and put candy in them to make an unconventional Advent calendar? If I do any of this, I'll share the techniques.
But really, when we're playing around, does what we make have to be for a purpose? For some of us, perhaps. I'm certainly mostly purpose-driven in my crafting. But it's still fun to simply play.
For now, let's just make these fun little boxes. As the photo above shows, you can do all sorts of variations with paper, string, felt, feathers, rocks, buttons, dimensional past, mulberry paper, designer paper, etc. I stuck to CAS white, but let your imagination wander!
1. To make the box...
 |
| I used Neenah solar white 80# weight. You could use designer paper (such as SU's) as well. Just don't use too heavy- or too light-weight paper. |
 |
| I scored the box on my ScorePal with a Teflon folder. This is better for the box than for the cover, as you'll see below. |
 |
 |
 |
| Pre-fold along the scores to make gluing easier. The wider score lines from the ScorPal and Teflon or bone folder work in your favor while folding the flaps over because there's plenty of room to accommodate the width of the paper. |
 |
| I pre-fold the end without glue to make sure everything will fit under the flap. Occasionally, you may need to trim the hidden flaps a bit. |
 |
| Use a little line of glue to hold things securely. |
 |
| Repeat the process on the other flap. |
 |
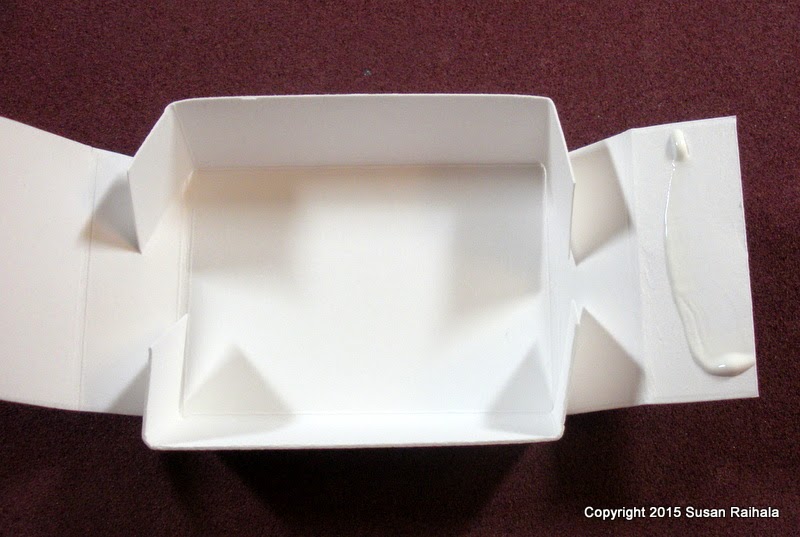
| The box is finished! |
2. To make the cover...
 |
| I add 1/8" to the length here because getting it to fit exactly can be a little tricky. |
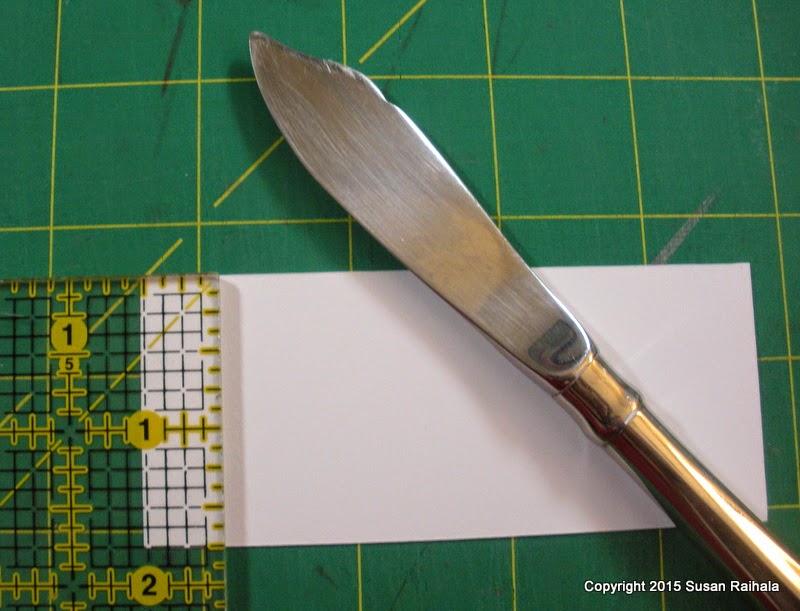 |
| I tried using the ScorPal for the cover and ran into trouble getting the covers to fit... they were too small. The butter knife gives narrower scores than the Teflon folder and the ScorPal. This technique is easier for me but could be adapted to the ScorePal if you don't have a quilting ruler and butter knife. The wider scores just need to be accommodated in the measurements. |
 |
| Note that the measurements have a + sign next to them. If you look carefully at the previous picture, you'll see that the ruler is a little past the 1/2" line on the paper. This allows for the thickness of the paper as you wrap around the box. You can see also how much narrower the score marks are when you use a butter knife. You might have to experiment a few times with the tools you have to figure out the fit. |
 |
| Pre-fold the scores and make sure the cover fits snuggly but not too tightly around the box. I had to throw away a few covers that simply didn't fit after scoring. But it's only paper, right!?!? If you want to stamp on the cover, now is the time to do it...before gluing it into shape but after you have the folds done so you can place your stamp correctly. |
 |
| Glue the lid with the box inside the cover. Carefully slide the box out and pinch the glued flap on both sides for a secure seal. |
And you're finished making your blank matchbox! Decorate as you wish.
Here are a few more examples of my CAS matchboxes.

To make this "Key to my Heart" box, I created a false bottom, sewed the key charm onto it, and attached it to the bottom of the box with dimensionals. These boxes are a half-inch thick, which gives you plenty of space for dimensional embellishments.
 |

Wouldn't this "Peace" box make a lovely Christmas ornament?!?!?
So there you go. Matchboxes can be a fun way to play around because IT'S ONLY PAPER!!!
I love making mini matchboxes! This is a great tutorial, and I really enjoy your CAS style. I made different size matchboxes as Christmas gifts; it's fun, because you can fairly simply make one for every family member, please it's a great way to use your scraps & small dies. Thank you so much for sharing. Best, CG
ReplyDeleteOh, thank you Susan! My husband is getting one for sure in his Valentine treat bag! Now I know how to make the box, I just have to think what to put inside and outside...
ReplyDeleteThanks so much, Susan. For all the great ideas as well as the specifics for the box!
ReplyDeletethank you. My daughter has moved away from home and lives in an area without snow and she misses it (go figure). I will be sending her one with a snowflake in it.
ReplyDeleteThese are just so cute and creative !! I love these ideas and this just opens an array of possibilities. Thanks for sharing ! :)
ReplyDeleteYou've made a wonderful photo tutorial. I check out your site every morning and love your CAS style. These little boxes give us opportunities to imagine and imagine. thank you so much.
ReplyDeleteVery cool. You do a wonderful job making tutorials.
ReplyDeleteThis is fun! What a great idea - and thanks for the tutorial.
ReplyDeleteOf course it is OK to make something for the sake of making it. You are just so pragmatic you threw us for a loop with your whimsy ;-). They would make a great advent calender but of course by the time I have time for it, my kids will be too old to care for such things. :-)
ReplyDeleteWhat a great idea, the question is can I make 30 by the weekend!!
ReplyDeleteThis comment has been removed by a blog administrator.
ReplyDeleteThese are so cute. I hope you don't mind, but I created a pin on my pinterest page and linked to this page.
ReplyDeleteI had such fun making this for my husband's Valentine! It's posted on my blog with credit to you. I made a little booklet to put inside the matchbox. He liked it a lot. Thank you again for the idea and the tutorial!
ReplyDelete